Menu ☰

Introducing CoVent Exhaust Fan Vent!
Introducing the CoVent Exhaust Fan Vent, an all-in-one exhaust fan vent designed for metal roofs. CoVent is ideal for interior exhaust fans equipped with a 3″ or 4″ flex hose. This exhaust vent is intended for bathroom and attic venting. CoVent is NOT designed for heating or dyer venting applications. Packed and ready for a simple installation.
If you are using a shingle roof exhaust fan vent, replace it with the CoVent Exhaust Fan Vent when reroofing with metal. Shingle roof exhaust fan vents can be very complicated to install on a metal roof, and will require a ton of caulk around the vent and roof to make sure that the vent is sealed properly. If the exhaust fan vent is not sealed properly, the metal roof will most likely leak and cause homeowners other problems. The shingle roof exhaust fan vents are complicated to install on a metal roof because the vent does not have the ability to bend and shape to the metal purlins properly like the CoVent.
Use CoVent Model EF 40 for a 4″ flex pipe exhaust. Use CoVent EF 43 for 3″ flex pipe exhaust and the package will include the 4″ to 3″ reducer.
Installation Instructions for CoVent Models EF 40 and EF 43:
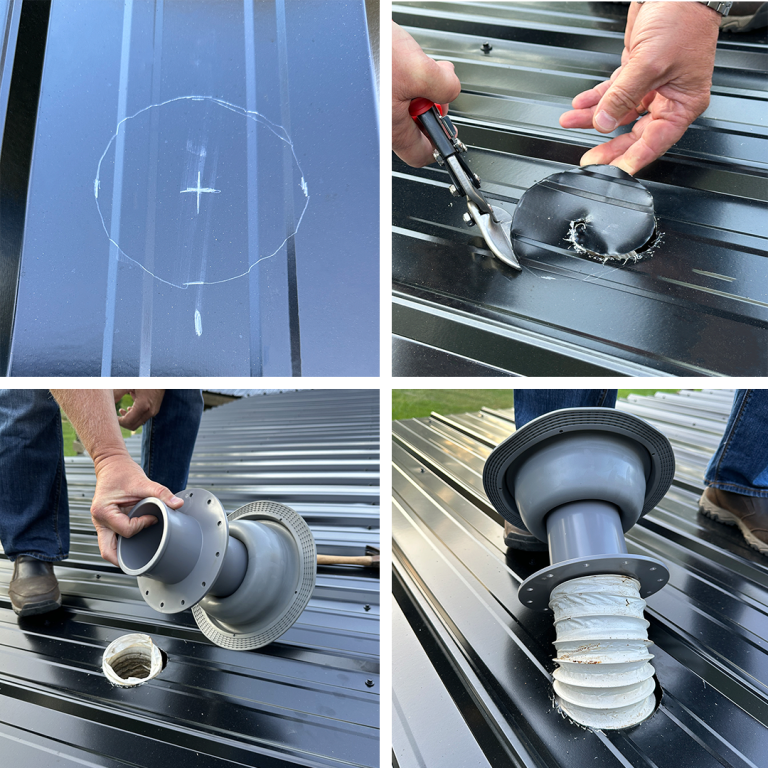
1. Remove the existing exhaust fan vent on the shingle roof.
2. Tack flex hose at old roof level so you can retrieve it later.
3. When adding furring strips to the roof, box out around the old exhaust fan vent opening with an approximate 5″ square.
4. As you install the new metal roof, mark the panel for the center of
the opening.
5. Center the CoVent over the mark you have previously made for the center of the opening under the metal.
6. Trace either the bottom of the CoVent product or the screw flange.
7. Cut a circular hole in the roof boot inside out to make it easier to access the pre-punched screw holes.


8. Flip the CoVent product over and turn the roof boot inside out to make it easier to access the prepunched screw holes.
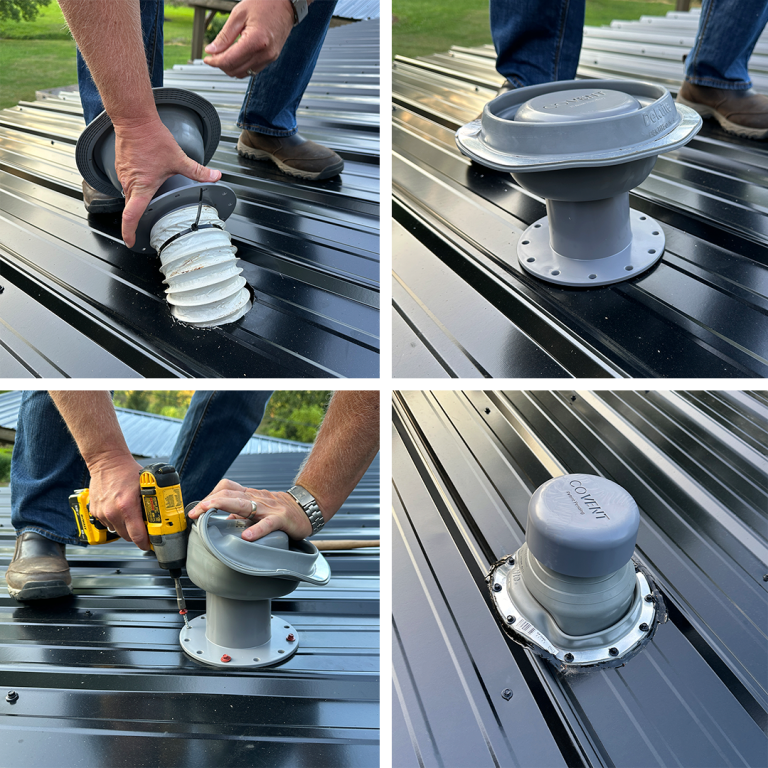
9. Retrieve the flex pipe and attach it to the bottom of the CoVent product with the included zip tie. Pull the zip tie until it is snug. The lip on the bottom of the CoVent product will keep the flex pipe from slipping off at the end.
10. If the flex pipe is 3″, use the CoVent Model EF 43 that includes the
4″ to 3″ reducer. Angle the reducer on the bottom of the CoVent product and “snap” it on. Once you have snapped on the reducer, it will not come off
unless you flatten the tabs. Use the zip tie to attach the 3″ flex hose and pull the zip tie snug. The lip on the edge of the 3″ end will keep the flex hose from slipping off.
11. Sit the vent down into the hole in the metal. If you cut the hole the size of the bottom of the CoVent product, you may have to use a 3/4″ spacer to keep it level. If you cut the hole the size of the screw flange you can sit it down against the furring strips and attach with 4 or more screws. There are prepunched holes the whole way around the screw flange so you have a hole wherever you need it.
12. Flip the roof boot down to its regular shape and install per the boot manufacturer instructions. Use a bead of caulk or butyl tape under the
lip of the roof boot before fastening with metal roofing screws with
rubber washers.
In conclusion, use the CoVent Exhaust Fan Vent in place of a shingle roof exhaust fan vent when reroofing with metal. If you have any questions or would like to place an order of CoVent please visit our website or call our Customer Service Team at (877) 897-7020 to speak to one of our team members!
